Tell the Scheduler when your year starts, when it ends, and which weeks you're taking off. It lays out every subject, day by day, for every child in the house — and reshuffles itself when life happens.
One purchase covers your whole family — every child, Tiny Tots through 12th Grade
Add your own courses right alongside your Timberdoodle materials
Print a weekly or daily checklist for your child to work with
Log what's done, set break weeks, and pull progress reports and transcripts
Already have a current Timberdoodle kit or handbook? You already have this — just log in and enter your activation code.

Most families never pay for the Scheduler separately — it comes with the curriculum. Here's how both paths work.

Free With Any Current Kit or Handbook

Or Buy Access on Its Own — $69.95
Buy It On Its Own, or Get It Free in a Kit


Log in to the Scheduler and click Manage Kits in the left menu, then scroll to the code box near the bottom of that page.
Type in the activation code from your curriculum handbook and submit it. Then check the grades and editions your family is using this year, and you're ready to build a schedule.
That's it. Happy scheduling!
Your activation code is on the second page of your curriculum handbook. It also comes in the email that arrives with your kit.
Most often it's because you're on the old scheduler. Codes from a 2026 handbook only work at scheduler.timberdoodle.com. Check your address bar. If it says legacyscheduler, that's the problem, and an old bookmark or an autofilled link on a phone can land you there without you noticing.
Two other things trip codes up:
- The code in your kit-builder link (the customizer one) isn't an activation code at all. Make sure you're using the one printed on the second page of your handbook.
- If a charter school, ESA program, or marketplace placed your order, that welcome email went to them rather than to you. Ask them to forward it along.
Still no luck? Chat with us and send along the code you're trying. We'll sort it out.
Yes! One activation code opens the whole Scheduler to your whole family, every grade from Tiny Tots through 12th Grade, Classic and Nonreligious alike, for as long as your kit's access runs. You are not limited to the grade you bought.
So if you have a fourth grader, a first grader, and a preschooler, that one code covers all three. Go to Manage Kits and check every grade and edition your family is using this year. That list decides which courses show up when you build a schedule, and you can change it any time.
Not using a Timberdoodle kit this year? One-Year Family Access does the same thing on its own.
They're still there. The 2026 Scheduler is a new app rather than an update to the old one, so last year's schedules stayed behind in the Legacy Scheduler.
If you have any, an Older Schedules card shows up on your dashboard and a Legacy Scheduler link appears in the left menu. Either one opens the old app in a new tab, so you can look at it, print from it, and copy over anything you want to keep.
Regrettably, there's no way to import them. This year's schedule does get built fresh. Setup only takes a few minutes now, and the new version handles breaks and pacing far better than the old one could.
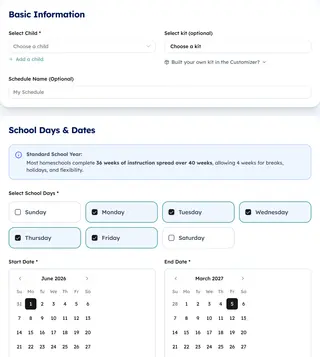
Go to My Schedules and click New Schedule. There are just two steps.
Step 1 covers three things, all on one page:
- Basic Information: which child, what to call the schedule, and which kit.
- School Days & Dates: your start date, and which days of the week you do school.
- Breaks & Recurring Days Off: Christmas, Thanksgiving, spring break, birthdays, vacations. Worth a few minutes if you plan to log progress as you go.
Step 2 is Review & Customize Courses, where every item from the kits you checked appears subject by subject. Add, remove, and adjust to your heart's content.
Then click Create Schedule. It takes a moment to lay out the year, and your new schedule opens right up. You'll find it on your dashboard and under My Schedules from then on.
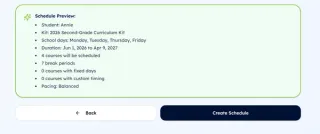
Clicking Create Schedule at the end of step 2 is what saves it. It takes a moment to lay out the year, and then your new schedule opens.
Nothing is locked in. You can edit the schedule, its courses, and its breaks whenever you like.
No. Each schedule uses one kit, so a child working through two grade levels gets two schedules.
Name them so you can tell them apart at a glance, like "Emma's Kindergarten" and "Emma's 1st Grade". You pick the kit on the first step of a new schedule.
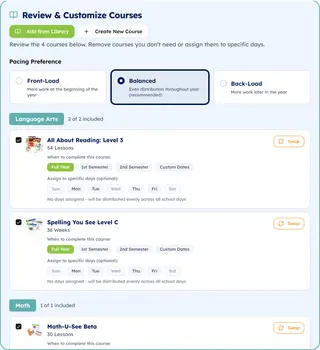
Step 2 of a new schedule, Review & Customize Courses, loads every item from the kits you've checked and lays them out subject by subject. That's where you add what you want, remove what you don't, and adjust how often each course runs.
Nothing there is final. Once your schedule exists you can add and remove courses any time from the green Add button.
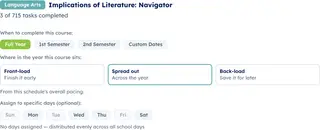
Definitely. Open the schedule, click Edit, and every course is listed there with its own settings.
Two settings do most of the work. "When to complete this course", which is where you set a later start: choose Custom Dates when you're waiting on a book to arrive, or saving a subject for January. And "Where in the year this course sits", which decides whether its lessons pile up early (Front-load), late (Back-load), or spread evenly (Spread out).
Change either one, click Save Changes, and that course re-lays itself out without disturbing the rest of your year. Anything already checked off stays checked off.

It decides whether a course's lessons pile up early in the year, late, or spread evenly. Two different controls set it, and it matters which one you reach for:
- Pacing Preference, on the schedule itself, moves your whole year at once. Front-Load, Balanced, or Back-Load.
- "Where in the year this course sits", inside a single course, moves only that course. Front-load, Spread out, or Back-load.
We often suggest first graders back-load 6-Trait Writing so they gain reading competency before writing starts in earnest. That's a one-course change, so use the second control. Front-loading works the other way, letting you finish science early and free up your spring for nature walks.
Nothing you set up is locked in, and editing won't cost you your progress. The checkmarks stay put.
Click Edit to change the name, your school days, your start and end dates, or your pacing. School year & breaks is where you add a vacation or a day off. That same Edit screen lists every course, so to change just one you can move where it sits in the year or give it its own dates there, then click Save Changes.
You can add a course any time with the green Add button, or remove one you aren't using, and everything reshuffles around what's left.
Change your mind in November? That's fine. Most of us do!
Go to My Schedules in the left menu, find the schedule, and click Duplicate on its card. You'll be asked which child the copy is for, which makes this the quick way to set up a second student.
Deleting takes two steps, on purpose.
Go to My Schedules and click Archive Schedule on the card. Then open the Archived Schedules section, click Show, and choose Delete on the archived card. We'll ask you to confirm.
Deleting is permanent, and it takes all of that schedule's logged progress with it. If there's any chance you'll want the year back, just leave it archived. Archiving costs you nothing and keeps the record.
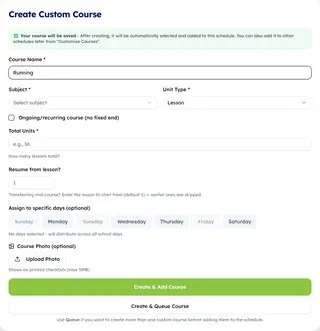
Easily! P.E., music, chores, piano, a co-op class, Scripture, anything at all. Open the schedule, click the green Add button at the top, then choose Create Custom Course.
You'll give it a name and a subject, then say how it should run. If it's a set number of lessons, say so and we'll spread them across your year. A 16-project carpentry course becomes 16 projects, spaced out. If it's something you do at a steady rate instead, mark it ongoing and give us a frequency, like three runs a week for P.E.
From there it behaves like any other course, with its own school days and its own breaks.
Add anything you like, whether it came from a previous kit, the damaged sale, a gift, or a co-op.
Open the schedule and click the green Add button at the top to reach the Add Courses page. If we sell it, search Available Courses and it comes in with its lesson count already set for you.
If we don't sell it, or it's something of your own like piano or dance, use Create Custom Course and fill in the name, the subject, and either how many lessons it has or how often it repeats. Either way it schedules just like everything else.
Nothing, most likely. That course is almost certainly set up as a finite one rather than an ongoing one, and the Scheduler treats those two very differently:
- A finite course has a set number of lessons. Tell us 16 projects and we spread those 16 across your whole year, which works out to about one every other week no matter how many school days you keep.
- An ongoing course has a rate instead. Tell us 4 per week and it repeats at that rate for as long as your schedule runs. This is what you want for math practice, reading time, P.E., chores, and piano.
So edit the course, switch it to ongoing, and set the frequency. If you've already done that and it's still landing once a week, that's a bug on our end. Chat with us with your schedule name handy and we'll take a look.
Usually it means the kit that item belongs to isn't checked yet. Go to Manage Kits and make sure every grade and edition your family is using has a check beside it, since your course list is built from the kits you've checked.
If it's still missing, it may be from another supplier, or something you'd like to add yourself. The green Add button on your schedule handles both.
And if it's a Timberdoodle item that belongs in your kit and simply isn't there, please tell us. We'll sort it out.
Your course list comes from the kits you've checked under Manage Kits, and a standard kit list doesn't know what your school swapped out. So if a charter school or ESA program customized your kit, or you built your own, you'll see the full list and some of it won't be in your box.
Just delete what you don't have. Open the schedule, find the course, and remove it. Its lessons come off the calendar and your days get shorter. Everything else stays on the dates it already had, so if you'd like the remaining work re-spread across the year, click Refresh afterwards.
Missing something you did pay for is a different matter. Send us your order number and we'll track it down.
The Scheduler uses whatever unit the publisher uses, so it changes from course to course. These are the ones that come up most:
- Real Science 4 Kids counts sections, and those are the numbered sections inside a chapter rather than chapters themselves. One chapter usually breaks into four.
- Play Smart Workbooks, set of 4, pages 3-4 means pages 3-4 of the book you're working through, not of all four books. Finish one, then start the next.
- A Math-U-See video lesson is the publisher's video for that lesson. If your set includes video access, it comes on an access card in your box that you redeem at new.demmelearning.com/subscribe. If you bought the DVD set, it's on the DVD.
When a line doesn't make sense, open the book's own table of contents. That's where the numbers came from.
Probably not.
What usually causes it is every course in the kit being left switched on and spread over a short year. A kit is meant to be picked from. Very few families use every course every day.
Two things fix most of it. Delete what you're not using this year, then click Refresh so the rest spreads back out. And stretch your year, because the same work over 40 weeks instead of 32 makes a noticeably lighter day.
If it still looks heavy, chat with us. Tell us the grade and the hours you're aiming for, and we'll give you our short list of what we'd drop first.

Day to day, you tick items off on the schedule itself as they're finished.
For the bigger picture, My Children shows each child's progress for the week and for the year so far. Reports goes further, with a Progress Snapshot, progress by child, and a completion rate over whatever date range you choose. Best of all, it prints, which is exactly what you want for a portfolio or a school.
Yes, and you don't have to tick three weeks of boxes by hand. Use Quick Log, the green button beside each course on the schedule.
Open it, pick the last thing your child actually finished, and everything up to that point is marked done in one go.
If that work was finished a while back, it asks when, so your records stay accurate instead of stamping the whole lot with today's date. Handy at the end of a month when the paperwork is due!
Grading stays off until you turn it on. Go to Settings, switch it on, and pick the scale you'd like as your default: letters, percentages, or points.
Turning it on doesn't force it everywhere. You still choose which schedules use it, and the first time you switch it on we'll offer to enable it across all of them, which is usually what you want.
From then on each completed assignment takes a score, and your progress reports pull straight from those.
Open the schedule and click Export & Print Options, then Weekly Checklist, then Print PDF. That gives you the week you're looking at.
If you'd rather have one page per day, use Daily Checklists and Print PDFs in the same panel. Leave the "Export all (full year)" box unticked and you'll get just that week.
One word of caution about the Full Year Formats row above those. Print Weekly and Print Daily there do exactly what the heading says and print your entire school year. Full Year - Daily is one page per school day, so it runs to a few hundred pages!
Open the schedule and click Export & Print Options, then pick what you want. Year Overview, Weekly Checklist, and Daily Checklists cover most needs, and Full Year - Weekly or Full Year - Daily give you the whole year.
From there your browser does the saving. In the print dialog, choose Save as PDF as the destination instead of a printer, and the Print button becomes Save.
One tip worth the ten seconds it takes: open More settings in that dialog and turn on Background graphics. Without it you lose all the subject colors.
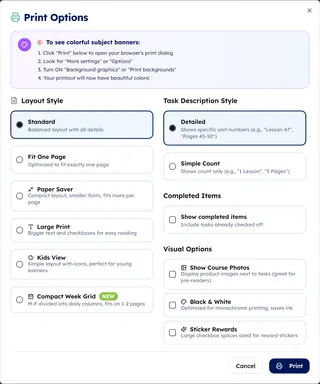
Yes, in Print Options. Layout Style runs down one side, with Standard, Fit One Page, Paper Saver, Large Print, Kids View, and Compact Week Grid to choose from.
The tick-boxes beside them are the ones people hunt for:
- Show completed items includes work already checked off. Leave it off and a week you've finished will print blank.
- Black & White saves ink on a monochrome printer.
- Sticker Rewards leaves checkbox spaces sized for reward stickers, which your younger ones will thank you for. It switches off when Compact Week Grid is the layout, simply because that one has no room for it.
Two places:
- On the schedule, the reading section shows what your child has logged as they go.
- In Reports, the printed report carries a Reading Log section covering whatever date range you pick, with finished books, books still in progress, and total minutes. That's the one you want for a year-end book list to keep or hand to a school.
Logged a book by mistake, or recorded a whole book when you meant a few pages? You can fix it yourself. In the reading section on the schedule, click See the full log. Every entry has a pencil to correct it and a trash can to remove it. A book read over several sittings is shown as one block, and Remove this book takes the whole book off the log, sittings and all.
Yes! There are two ways to do it, depending on whose device they'll use. Set either one up under Student Mode, then Student Access, in the left menu, or from the "Student access & logins" button on My Children.
- On your device: give each child a 4-digit passcode. They tap their name on the Student Login page and type it in. You keep a separate parent passcode to get back out.
- On their own device: click Set Up Email Access, enter their email address, and check it over on the review step. Once you confirm it, we send the invitation and they sign in as themselves, which suits an older student with their own laptop.
Either way your child can tick off what they finished but can't move courses, change dates, or touch your settings. On your device that view is called Student Mode and your parent passcode gets you back out. On theirs, they simply sign in and out of their own account.
A teacher or education specialist, absolutely. Add their email under teacher access and your schedule appears on their own dashboard. It's view only, so they can follow along and print reports, but they can't check work off or change anything.
A co-parent who needs to mark work complete is a different case, and regrettably teacher access won't do it. They'll need to sign in to your account on their device. From there, your child's Student Mode passcode keeps them to checking work off and nothing else.
Click your name at the top of the left menu, or the pencil inside the menu if you're on a phone, to change your display name or profile photo.
Your password lives elsewhere. Go to Settings and choose Send password reset email, and the link will arrive at your account email address.
Yes, with One-Year Family Access, which opens the Scheduler without a kit.
From there, choose "No kit selected" in the kit box on the first step of a new schedule and confirm Continue without a kit. You'll land in an empty schedule and build the whole year yourself.
Add anything you like: a co-op class, piano, another publisher's math, chores. Name it, tell us how many lessons it has or how often it repeats, and we'll spread it across your year exactly the way we do our own courses.
Probably not forever, and we'd rather tell you that than have you find out the hard way.
For now we aren't removing anything at all. Your schedules stay put, including the ones you've archived. Down the road we expect to start retiring schedules once they're around three years old, when they've usually stopped being useful to you and turned into clutter.
When that day comes, you'll hear from us first. We won't remove a schedule without emailing you well beforehand, with plenty of time to print or save whatever you'd like to keep. So do keep your email address current in your account.
Storage costs being what they are these days, that timing may well shift. What won't shift: we'll keep your work live as long as we possibly can, and you'll always hear from us before anything goes.
Just ask us! Use the chat button inside the Scheduler, or email hi@timberdoodle.com.
If something looks broken, send the schedule name along with your question. That lets us open the same screen you're looking at, which usually saves a round of back and forth.
Ideas for the Scheduler land in the same inbox, and we do read them. A good share of what's in here started as somebody's email.
Yes, and they are yours to set. The colors you pick only affect your family.
Go to Parent Settings and find Subject colors. Every subject you use has a color swatch beside it. Click a swatch and pick the color you want.
Your choices show on the schedules you print, including the subjects you added yourself, and on screen they color the tile of any course with no cover picture, or one that will not load. The Compact Week Grid layout is an exception: it prints its headings in a single color.
Changed your mind? Each subject has its own reset, and Reset all puts every subject back to its usual color in one step. Your subjects, courses and schedules are not affected, only the colors.
Yes. Open the schedule and click Order at the top. Drag a subject or course into the place you want it, or use the up and down arrows beside it, then save.
Subjects move as a group, and you can order the courses inside each subject as well, so the backbone curriculum can sit above the material that supports it.
The order you set is used on the schedule, on your child's dashboard, on the report you share with a teacher, and on the schedules you print.
Have more than one child? Once you save, the Scheduler offers to copy the same order onto your other schedules, so you only have to decide it once.
Put it back the way it was undoes the order and returns the schedule to how it listed things before.


First of all— welcome ! If you're just starting your homeschool journey, we're thrilled to cheer you on and help you every step of the way. Here are some questions you might have as you get started. H...
Read Article
We often get the question, "How do Timberdoodle Curriculum Kits line up with my state's requirements?" Here is a brief overview of what subjects each state requires and how that lines up with our Curr...
Read Article
A 12-Question Checklist Every Curriculum Seller Has a "Wonderful Plan" for Your Life As summer begins, your inbox floods with promises: "This kit will fix everything! Your kids will beg for math! You'...
Read Article